
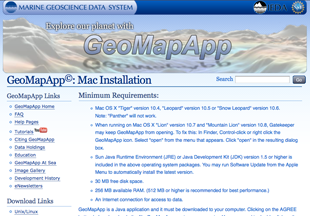
GeoMapApp© Mac OS X "Mountain Lion" version 10.8 and "Mavericks" version 10.9 Installation Steps
GeoMapApp Links
- GeoMapApp Home
- Recently-Added Data
- FAQ
- Help Pages
- Video Tutorials

- User Forum
- Terms of Use
- Citing GeoMapApp
- Education
- GeoMapApp At Sea
- Image Gallery
- Development History
- eNewsletters
- Statistics
Download Links
Apple Disk Images (.dmg files) are disk image files commonly used by the Mac OS X operating system. When opened, an Apple disk image is "mounted" as a volume within the Finder.
Apple disk images allow secure password protection as well as file compression and hence serve both security and file distribution functions; they are most commonly used to distribute software over the Internet.
By default, newer versions of OS X will only allow you to install applications downloaded from the App Store. If you have difficulty installing GeoMapApp on your Mac OS X 10.8 or 10.9, please follow the following step-by-step guide.
GeoMapApp Installation on Mac OS X 10.8 and 10.9
Step 1:
Go to the GeoMapApp Mac Installation download page.
Step 2:
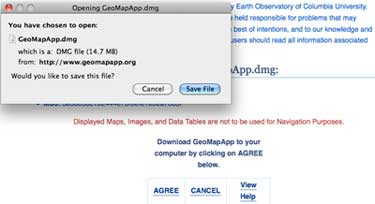
Click on Agree at the bottom of the page to begin downloading the GeoMapApp.dmg. Save the file to either your Desktop or Downloads directory.
Step 3a:
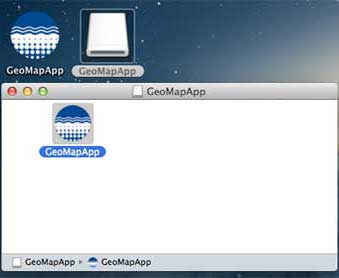
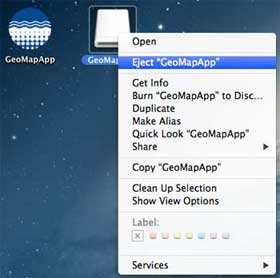
Navigate to where the file has been saved and double click on the GeoMapApp.dmg file. A white disk image named GeoMapApp should appear on your desktop. A popup window will also appear with the GeoMapApp application. You must drag the GeoMapApp icon out of the disk image directory and onto your desktop. Then eject the disk image. The GeoMapApp icon should remain on your desktop.
Step 3b:
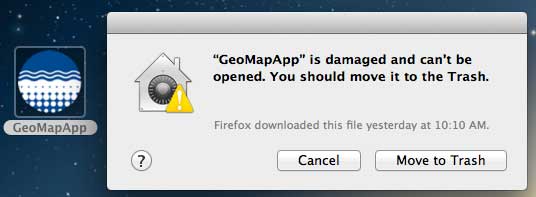
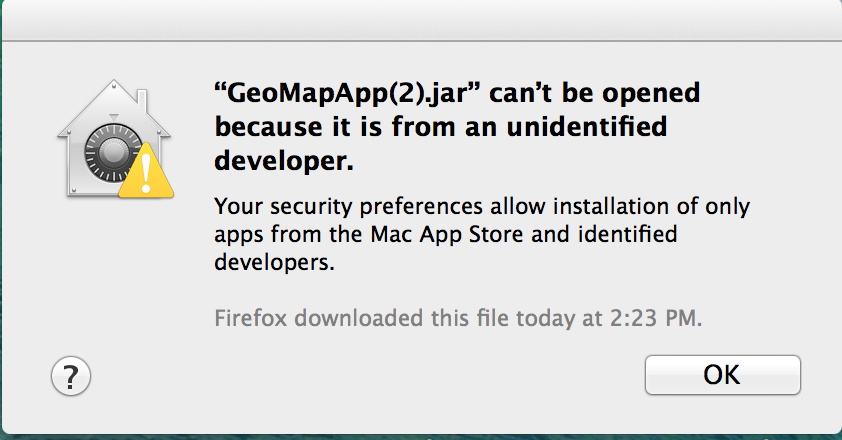
Double click this to run the application. Most users will receive a message stating either "GeoMapApp is damaged and can't be opened. You should move it to the Trash" or ""GeoMapApp.app" can't be opened because it is from an unidentified developer. Your security preferences allow installation of only the apps from the Mac App Store and identified developers." If you receive one of these message or cannot open GeoMapApp proceed to step 4.
Step 4:
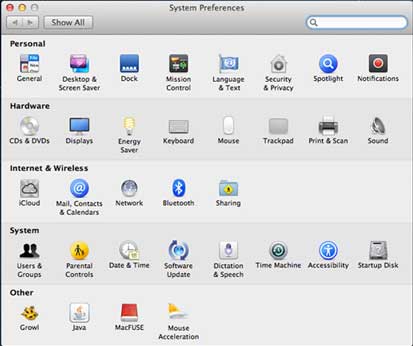
Go to System Preferences. This is found at Macintosh HD -> Applications -> System Preferences. Click on "Security & Privacy".
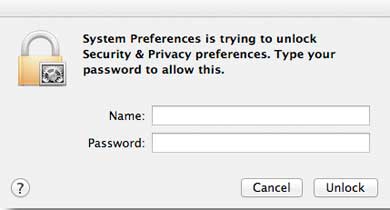
Step 5:
To edit the security settings, check the status of the padlock icon in the bottom left of the window under the General Tab. If the padlock is closed, click it, enter your Mac credentials in the pop-up window, and click Unlock.
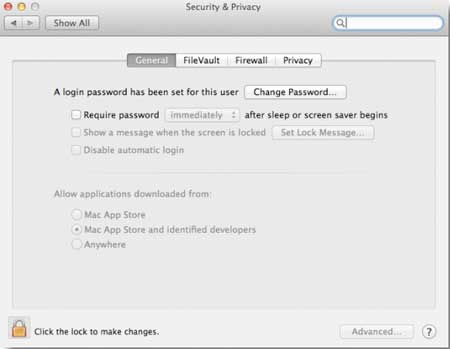
Step 6:
Once the padlock is open, you'll see the three options for "Allow applications downloaded from". The default is "Mac App Store and identified developers", as shown below.
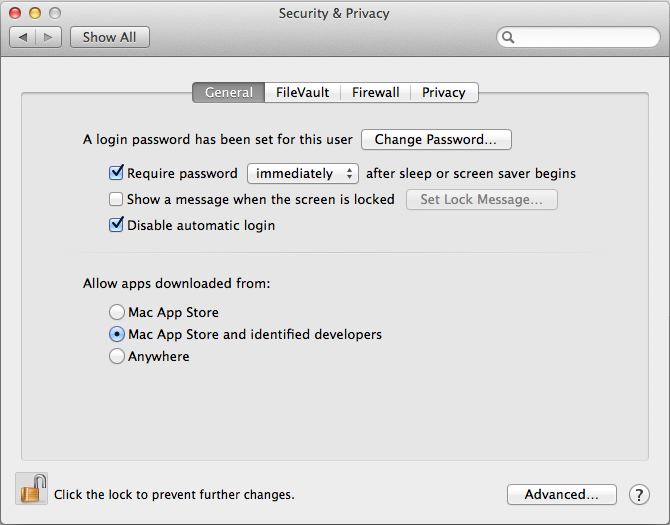
If the first option ("Mac App Store") was already selected, GeoMapApp will not run. Instead select the second option "Mac App Store and identified developers" and proceed to the next step.
Note: In rare instances, only the third choice - the "Anywhere" option - will allow apps from outside the Mac App Store to be installed. In that case, we urge you to proceed with caution since that option makes your Mac less secure. If you are forced to choose the "Anywhere" option, please install GeoMapApp and then return to this Security and Privacy screen to reset the selection back to either "Mac App Store" or "Mac App Store and identified developers".
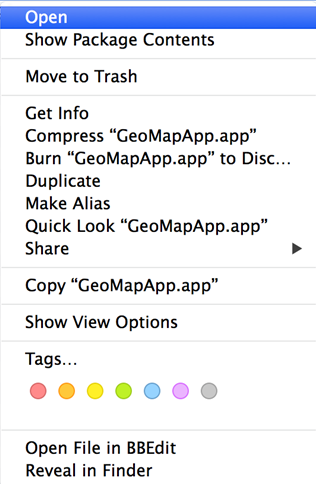
Step 7:
Proceed to open GeoMapApp by right-clicking on the GeoMapApp icon and selecting Open.
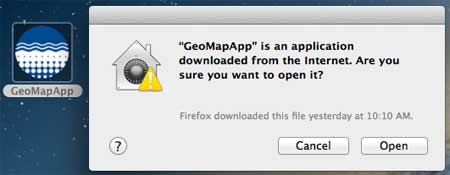
You may receive a final pop-up asking you if you are sure you want to open this application. Click Open.
Step 8:
The GeoMapApp application should be now running on your machine. You will not need to change any security settings next time you start GeoMapApp - it should start normally from now on.
Step 9:
If you were forced to choose the "Anywhere" security option in Step 6, please remember to return to the Security and Privacy screen to reset the selection back to either "Mac App Store" or "Mac App Store and identified developers".
If you are still experiencing problems, please contact us at info@geomapapp.org with a detailed explanation of the issue and any screen shots that might be helpful.
|
Hosted at Lamont-Doherty Earth Observatory of Columbia University. Site licensed under Creative Commons Attribution-Noncommercial-Share Alike 3.0 |

|
Funded by the US National Science Foundation (NSF) |